| Setting up a Simple Central American Cichlid Aquarium (using convict cichlids) |
|
| Setting up a Simple Central American Cichlid Aquarium (using convict cichlids) |
|
Keeping cichlids need not be complicated. In fact, keeping certain cichlids can be pretty easy. Other cichlids demand more care, and some species demand a lot of care. For the purposes of this page, I assume that you are interested in setting up a simple, but interesting and enjoyable cichlid aquarium.
From this particular kind of tank, your enjoyment will come not from having vast shoals of brightly-colored fish milling endlessly about your living room, but rather from watching and appreciating the fabulous parental behavior of a wonderful little cichlid, namely the convict cichlid.
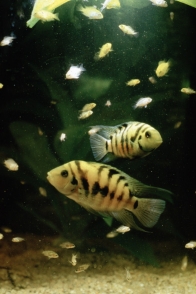
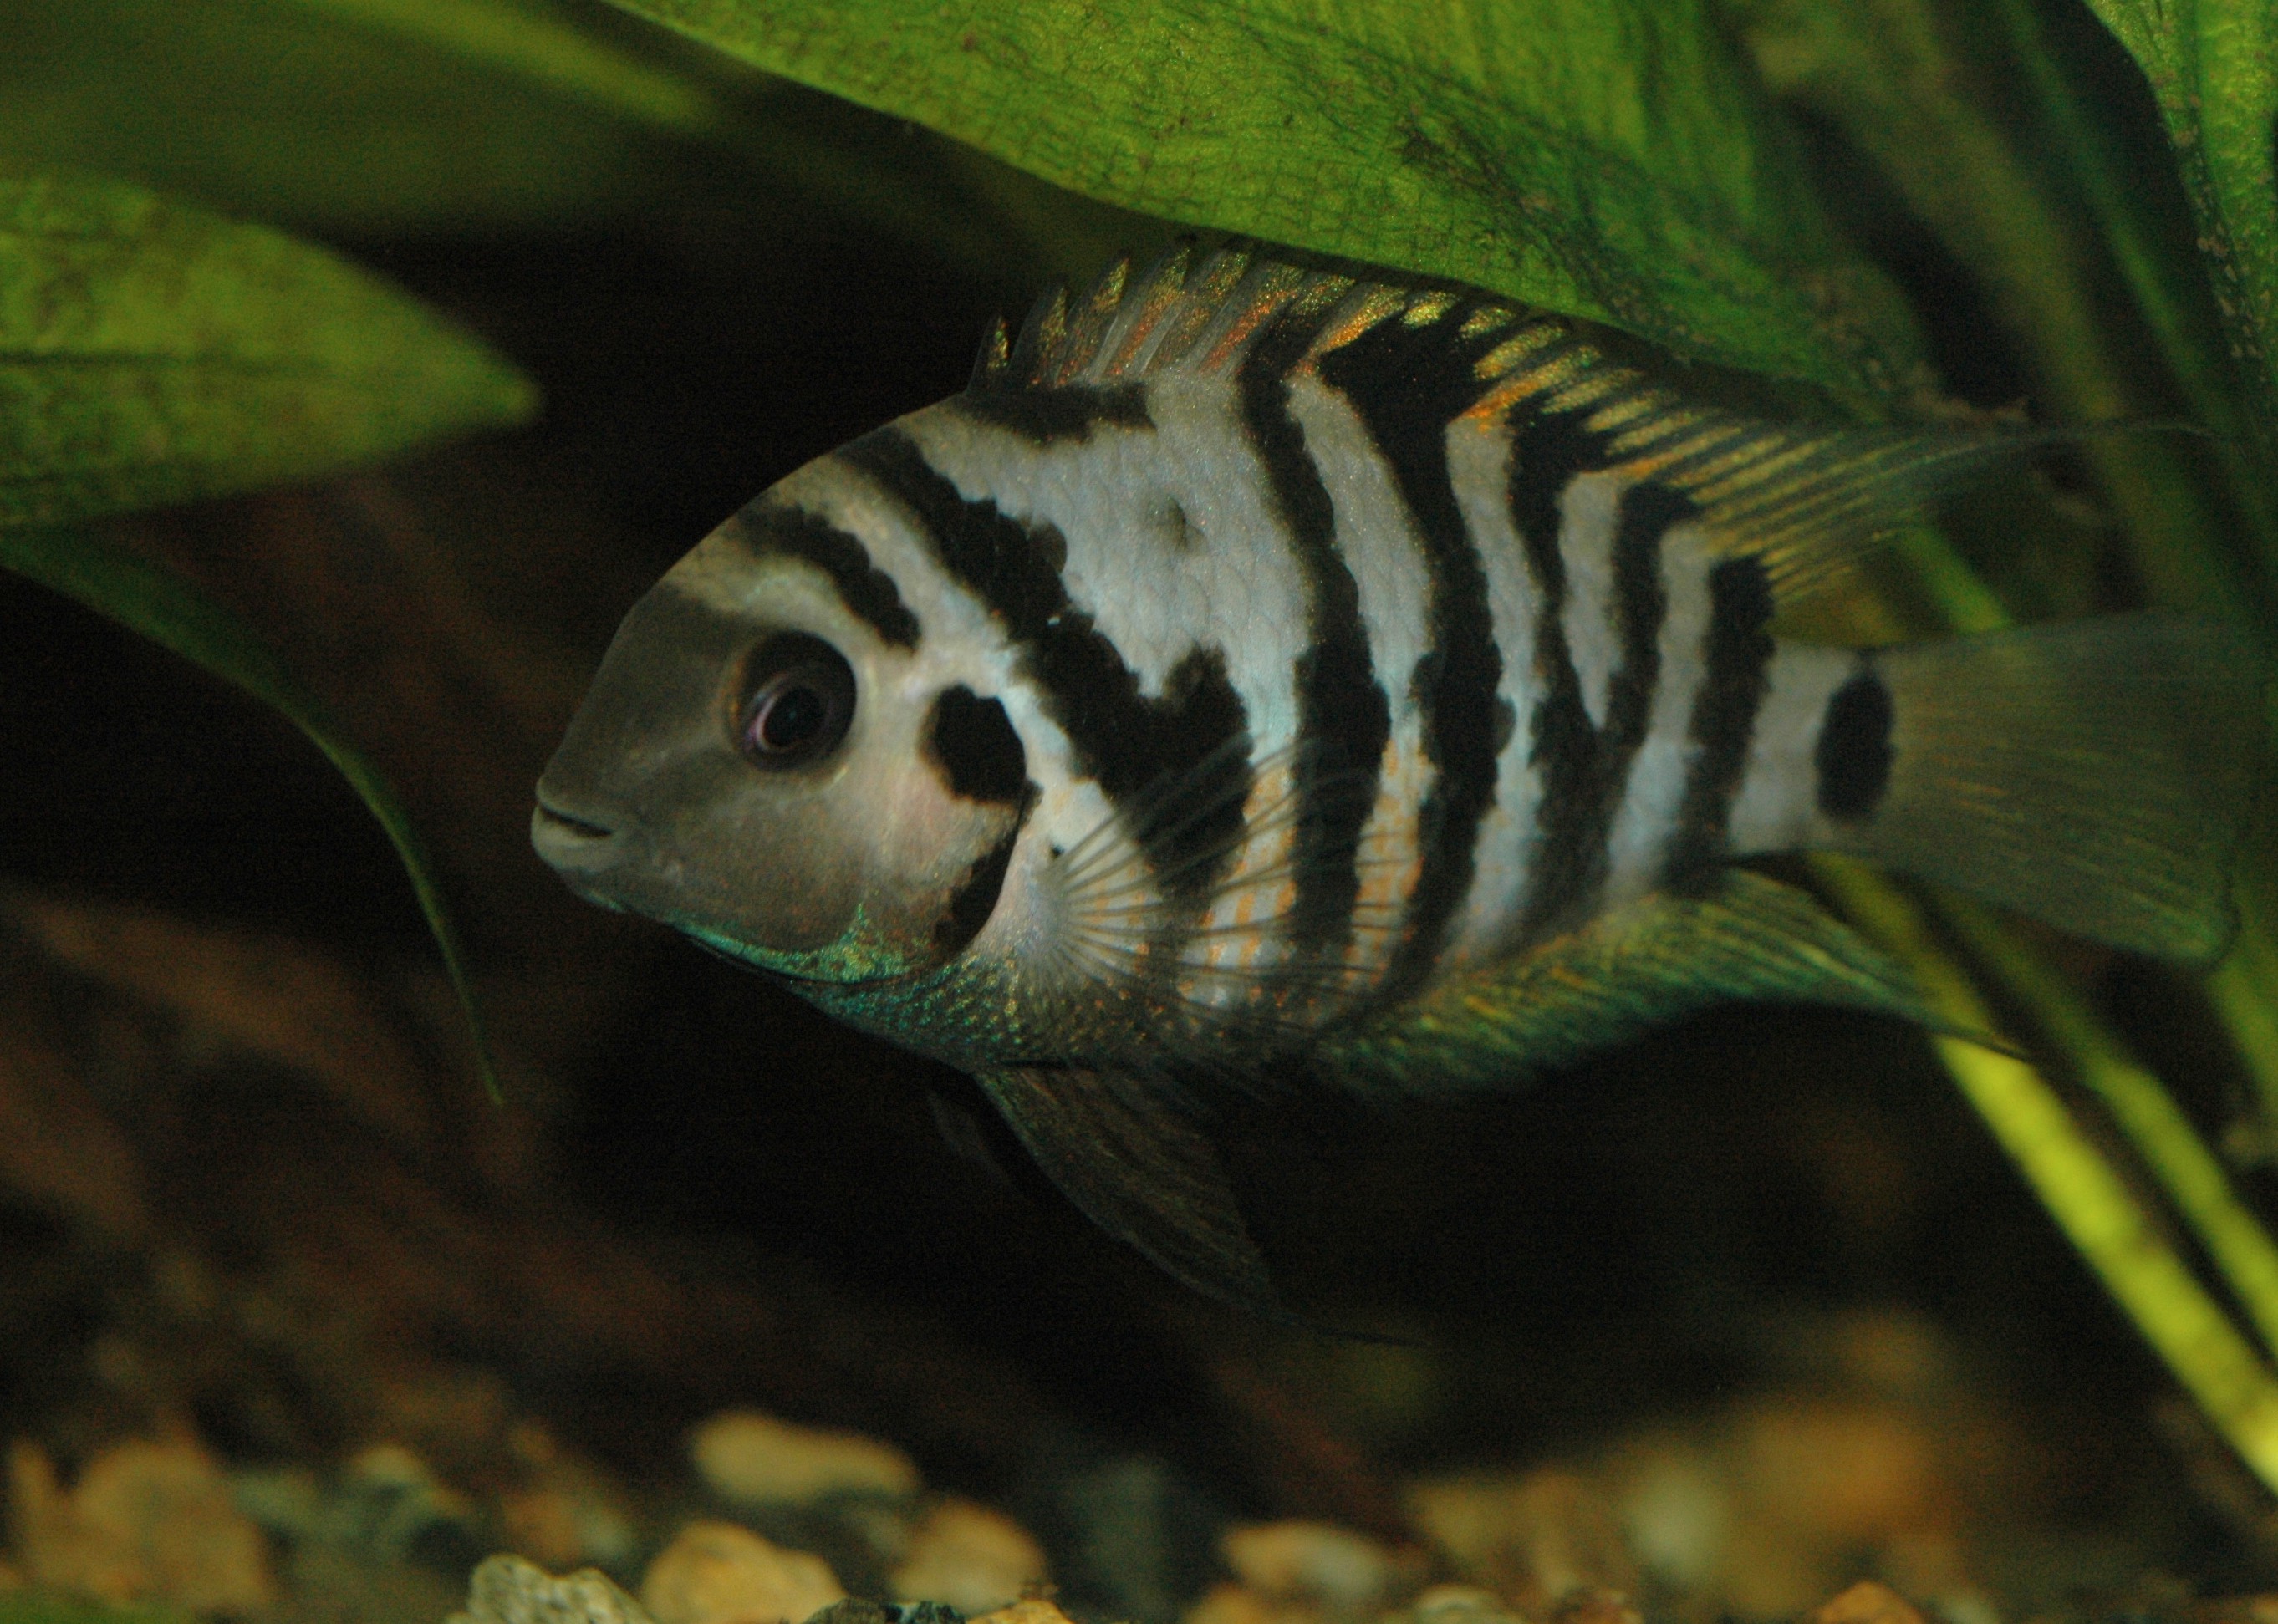
The convict cichlid (Archocentrus nigrofasciatus) comes from Central America, particularly Costa Rica and Nicaragua. [You may also see it listed as Cichlasoma nigrofasciatum and occasionally as Crytoheros nigrofasciatus ]. It lives in a range of habitats and seems highly adaptable to different water conditions. Most importantly, these things breed! A pair of convict cichlids seldom waste much time before they get down to the business of raising some kids. This makes them an ideal animal to work with and to reveal the true beauty of cichlids, namely their parental behavior.
I am going to assume that you want to keep your costs down. I will describe what you absolutely must have to be successful. If you are not prepared to get the following items, don't start until you are. For example, many people think they will not get a heater right away -- that is a serious mistake and the worst part is that the fish will pay for your mistake with their lives. Don't do it!
I will make recommendations of specific brand names not because I am sponsored by those manufacturers; I am not nor do I receive commissions. I have kept hundreds of aquariums and thousands of fish and I am telling you what I would buy if I started anew tommorrow and wanted to guarantee success. In fact, when I set up experimental research tanks, this is how I do it.
No doubt a salesman might try to convince you that some other equipment is the way to go. The choice is up to you, but I suggest that you consider my recommendations carefully. For example, there are lots of types of filters, but only sponge filters won't suck up baby cichlids like just about every other kind of filter on the market. Sponge filters have no maintenance costs, and they never break.
Equipment
You MUST get the following:
1. An aquarium. Any size larger than 10 gallons will do. I strongly suggest a tank size known as a "20 gallon long". This is 30 inches long, 1 foot high and 1 foot front to back. It is a nice compromise between all sorts of factors, which I won't go into here. Convict cichlids seldom use the water more than 1 foot above the substrate so a tall tank is a waste of money. A 15 gallon long is okay, but less desirable. A 10 gallon tank is much harder to work with and I encourage you to get something a little larger ($30)
2. Gravel. Please resist the urge to get fluorescent orange. Get a simple shade of brown or gray. For a 20 gallon tank, you will need about 20-25 lbs of gravel. ($10)
3. Heater. You need a 100 or 150 Watt heater. I highly recommend the heaters made by Ebo-Jager. I have used them for over 20 years and they work consistently and with no surprises. I know all sorts of other brands promise all sorts of things, and I have tried many of them: consider buying an Ebo-Jager. ($25)
4. A small aquarium handnet ($3)
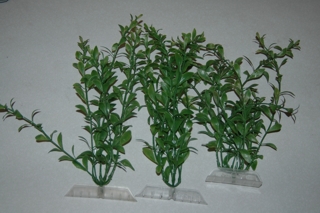
5. Two or three plastic plants. Get something bushy; don't get the bright blue ones! ($10)
6. An air pump. ($10)
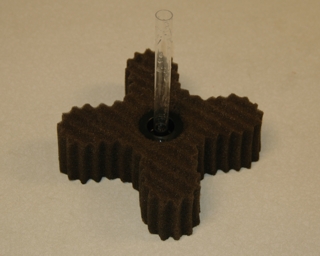
7. A sponge filter. The sponge filter is by far the best choice for a small aquarium. There are several brands that I like. I most prefer either the Lee or Jungle brand sponge filters that look like a clover. You can get by with the 4" square. Don't get the small circle one. Alternatively, get the cylindrical ATI sponge filter that stands upright. Sponge filters are fantastic for small tanks. They clean the water very well and you don't need to replace the thing for years meaning there are no maintenance costs.
Another real advantage of a sponge filter for breeding cichlids is that the babies can't get sucked into the filter. In fact, I often find the babies grazing off the fine particles trapped on the surface of the sponge filter.
Cleaning one takes less than five minutes. ($10)
8. Six feet of airline tubing ($1) and a backflow check valve ($1)
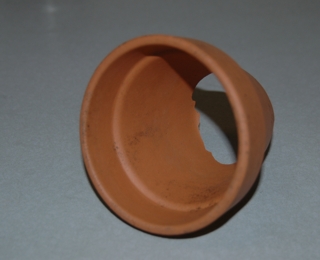
9. A 3-1/2 or 4 inch diameter clay flowerpot (brand new, and it must be clay; the eggs won't stick to a plastic flowerpot very well). ($1)
10. Some paper (colored if you wish).
11. Two brand new white buckets or pails; the five gallon size will do nicely. Rinse them out many times. Take a waterproof marker and write on one of them in large letters "CLEAN". Do not allow anyone to use that bucket for anything other than your fish. That bucket is sacred. On the other bucket write in large letters "DIRTY". It is less sacred, but don't use it to wash your car. ($5)
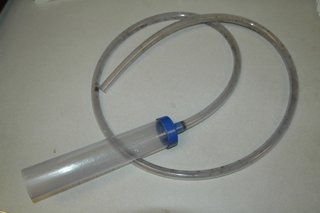
12. A gravel siphon. This simple contraption consists of several feet of 1/2 inch hose attached to a wider plastic cylinder. A gravel siphon is crucial to your success. ($10)
13. Some kind of cover or lid for the tank. It can be glass, plexiglass, "egg-crate", plastic, or a custom-made redwood cover with mahogany inlay. Your choice. It doesn't have to fit air-tight, but it does have to keep the fish from leaping out, which they will do if you do not cover the tank.
14. A thermometer. I use the little floating ones. ($2)
15. If your water has Chloramine (not Chlorine) added by the water utility, you will need a Chloramine remover. Otherwise you do not. Keep in mind that pet stores make tons of money on the sale of chemicals, most of them unnecessary. You should call your water utility and ask them "Do you add Chloramine?" Persist until you reach someone who actually knows, not someone who thinks they know. And be clear that you are interested in Chloramine (pronounced Clor-ah-mean) not Chlorine. (For your info, Chloramine is a molecule that serves to keep chlorine in the water. Without the amine part, any chlorine evaporates within 24 hours, which is why you don't need all those chemicals. This also means that Chloramine is likely a rather nasty environmental pollutant, making the wisdom of adding it to our drinking water and ultimately dumping it into the environment an interesting topic...).
16. TetraCichlid flake food. There are lots of brands of fish food and you can get what you want (just don't buy unlabelled house brand food or Goldfish food). I have used TetraCichlid for 15 years and I will continue to use it. If I were a convict cichlid, TetraCichlid is what I would eat! It looks good, and has good properties in terms of resistance to rotting etc.
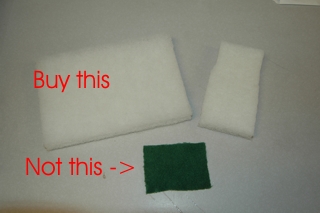
17. A scrubee pad. Get the white kind -- they are less likely to scratch. It is better to buy one in an aquarium shop rather than in a grocery store. The green ones in grocery stores often have an anti-mold chemical added to them which is quite toxic to your fish. I buy the big ones and cut them into little 2 inch strips. One big one cut up will last many months.
Optional
1. Light for the tank. Often this is included when you purchase a tank and may be part of a cover/light package. The light is for your benefit, the fish couldn't care less and in fact often prefer a darker tank.
2. More plants, rocks.
3. Nice background (see below).
Setting Up the Aquarium
The tank
I assume that you have a table or counter strong enough to hold the tank.
Rinse the tank. Do not put any soap anywhere near an aquarium at any time. If you have any soap on your hands, wash it off thoroughly before you go near your aquarium. Soap is deadly to fish, it destroys the protective layer of mucus on a fish's body.
Place the tank where it will reside permanently. By the way, never move an aquarium that has more than an inch or two of water in it. First of all it is very heavy and dangerous; second of all, the tank will start leaking because of the stresses you put on the silicone.
The gravel
Wash the gravel (even if it is new). Washing gravel consists of pouring a couple of inches of gravel into your bucket, adding warm water and swirling the gravel with your hand many, many times. The water will get cloudy. Pour out the water (but not the gravel). Add more water and do it again. Keep doing this until the water no longer gets cloudy (and you have worn off your fingerprints).
Add the gravel to the tank. Be careful not to dump in a whole bunch of gravel at once, the tank is made of glass and will break if you abuse it.
The water
You now have a tank on a table/counter/stand with a layer of gravel in the bottom. Add tap water. Unless you live in a toxic waste zone, in most cases, normal tap water will be quite fine for convict cichlids. If it isn't, you probably shouldn't be drinking that water and you might consider moving. To add this water, fill your CLEAN bucket with some water and pour it into the tank. Any water going into the tank from this point on will always have entered via the CLEAN bucket. Nothing else should ever be in your CLEAN bucket.
Add enough water to fill the tank about three-quarters full.
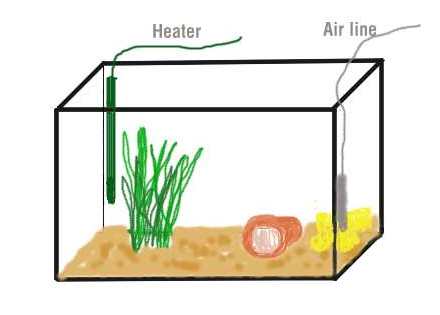
The heater and filter
Examine your Ebo-Jager heater. Set it at half-way which should give you a temperature around 80oF (26oC). Insert it along the back wall. It is completely submersible. Don't plug it in yet.
Put the sponge filter in a back corner and hook up the airline tubing between the sponge filter and the air pump. You may want to include a "backflow check valve" on this airline. This inexpensive ($1) piece of plastic prevents the water from being siphoned out of the tank and into the pump in the event of a power outage. It is a wise investment.
Turn on your air pump, and the sponge filter should start working.
Plug in your heater. Let it work for a few hours and see what temperature the tank settles at. You are aiming for 80oF. Adjust the heater until you get it within a couple of degrees or so: 85oF is too hot. 75oF is too cold. Note that your lights, sunlight, room temperature, etc will all affect the temperature of the tank, so it may take a little fiddling to get it right.
Decorating
Add your plastic plants in a clump near one end, but not right at the end. You need to cover the base of each plant with gravel to keep it from floating. The cichlids will dig the plants out. Don't worry. They like to do that. It is part of what they do. Replant the plants and let the cichlids dig them out again.
Now comes the fun part. You need to break your flower pot. I suggest you wear eye-protection for this. You will need a hammer and a flat-head screwdriver. Place the pot bottom down on a concrete floor or sidewalk. If you want, you can put a piece of newspaper under it to make clean-up easier. Now, holding the screwdriver upright, put the blade of it in the bottom of the pot. Hit the handle with the hammer. If you are successful you will hear a delightful cracking noise as the pot starts to split. Move the blade around and hit it again. What you are trying to do is knock the bottom out of the pot. What you will likely do in reality is knock off the bottom along with part of the side. No big deal. There are no points for aesthetics.
Take your bottomless flowerpot and lie it on its side with the widest opening towards the front, at the end of the tank opposite to the plants, but not right at the end. You want the pot so that you can see inside but also so that the fish inside it doesn't feel overly exposed (which would happen if you put it right at the front glass).
Fill the tank up with water, but not right to the top.
Put the lid on your tank and let it sit for a few days. It is quite normal for there to be all sorts of little bubbles all over the glass. Don't worry about them. They will go away eventually. If they haunt you and you cannot sleep, wipe them off with your hand.
During this time, construct a background for your tank. The simplest background is sheets of paper taped to the back and sides of the tank. People misunderstand the purpose of the background. Partly it is for you to look at. But equally important it is to provide some comfort for the fish. If the walls of the tank have no covering, the fish will feel very exposed and it will take them much longer to settle into their new tank. If you want to purchase a plastic or vinyl background, they do the job nicely. If you want to save money, use colored paper. Again I suggest subtle natural colors (light blue, green, brown) and not reflective magenta. The fish have to live with your choices! They come from a world of subdued light and pale colors, not a disco.
Prepare your CLEAN Water
Fill your CLEAN water bucket with tap water and put it somewhere out of the way. This bucket is going to always sit full of water. This is the water you will use when you do your weekly water change. (My cats seem to think this is really special water, far better than the regular water they get, and they like to drink out of this bucket. That is no problem.)
Wait
You now have to wait at least one entire day (this is to stabilize the temperature and to make sure any chlorine has evaporated).
Selecting the Fish
At least one full day after you have set up your tank, go to a fish store and ask if they have convict cichlids. Almost certainly they will. I avoid the places like Petsmart when buying fish -- the fish in there often look very unhealthy. But the choice is yours.
You are looking to get a male and a female convict. The best way to do this is to simply sit and watch a tank of convict cichlids for a few minutes. Enjoy this time. If you watch carefully and the fish have had a chance to settle down, you will start to notice two kinds of fish in a tank full of convicts. There will be some that have fatter bellies, with either a little or a lot of orange on the belly. They will likely be some of the smaller fish and perhaps have more contrasty markings. Those are female convicts.
There will also be some other fish, often with longer fins on the top and bottom, and a generally more robust appearance, that have no orange on the belly. Those are probably males. Likely there will be one fish in particular who seems to be king of the tank. It will almost always be a male. (For additional information on how to tell the sex of a cichlid, click here).
Also, look closely at the gravel in the tank. Provided it hasn't been disturbed by someone catching a fish recently, you may notice that in one (or both) of the back corners (or near a rock etc) that there is a depression or pit. This is a sign that someone in that tank is trying to nest. They have dug the pit as a potential nest site. I have seen convicts attempt to nest in tanks chock full of other fish. There is no stopping a determined convict. If you see such a pit, watch for awhile and you will probably notice that one of the females and perhaps one of the males seems to have an inordinate fondness for being around that pit. If you can get that female you are almost guaranteed success. Virtually any male will do (they are almost always ready to spawn). Don't worry if you can't get that particular female, the others will probably be almost as eager to spawn.
How large do they have to be? I have had female convicts of 3/4 of an inch spawn, so they don't have to be very large.
Remember you must not get your fish until your tank has sat for a full 24 hours.
Bring your fish home and float them in the tank for an hour or so, i.e. leave the bag closed but float it in the tank. After an hour, open the bag and gently let your fish emerge into their new home.
A Word about "Cycling" Your Tank
This does not mean that you are to take your tank on a bicycle trip through the French countryside: Cycling refers to initiating the natural nitrogen cycle in an aquarium. The following will be on the exam, so pay attention. Filters serve two functions in an aquarium. They serve to mechanically remove chunks of icky stuff. However, an equally important, if not more important role of a filter is to serve as a substrate for biological filtration. The real work horses of an aquarium system are tiny bacteria. These break down the fish waste and uneaten particles of food and turn those toxic items into harmless substances. A properly designed filter provides vast amounts of surface area for these bacteria to grow (this is why sponge filters work so well).
Now, you can't just take a sterile chunk of sponge and drop it in your aquarium and expect a prolific colony of helpful bacteria to sprout up and do all of your dirty work. It takes time. In fact, it takes a few weeks for the filter to really get going. But in order for the bacteria to get up to speed, they need to feed. They feed on fish waste. So, you are in a bit of a Catch-22. You need the filter working to keep your fish healthy, but you need fish living in the tank to get the filter going.
The most common cause of aquarium failure is when someone dumps a whole bunch of fish into a newly setup tank. The bacteria simply can't get going fast enough and the fish will die all of a sudden several weeks later as the ammonia level in the tank reaches a toxic level.
So, how do you win? If you start with just a few fish (one or two), they will produce enough waste to get the bacteria going but not enough to generate massive amounts of ammonia. Certain fish are more sensitive to ammonia and its byproducts, others are more tolerant. Fortunately, convicts are very tolerant and this is why we can put a pair of them in a brand new tank and not have to worry about waiting four to six weeks for the tank to "cycle" fully.
There are other tricks to speeding up the cycling process which some people employ. Using some water and gravel from an existing healthy tank is one method. Another is to take a sponge filter from an existing tank and use it in the new tank. Of course this means that the existing tank will need to get a new sponge filter. But this is not a problem because even a brand new filter placed in a healthy existing tank gets up to speed quite quickly. There are even some bottles of stuff that you can buy that claim to start or enhance the cycling process. I never use those things. Again the choice is yours. If you feel the need to spend more money, invest in a larger tank or send a donation to the Nature Conservancy to help protect the natural habitat of cichlids.
What to expect
For the first few days, your cichlids may spend a lot of time sitting on the bottom in a corner. But, after a few days (sometimes sooner) they will start swimming about, poking around the tank. Feed very little the first few days until the fish show some eagerness to eat. Otherwise you will just be piling up rotten food in the tank.
Remember, if your fish don't eat a little food, they certainly aren't going to eat a lot of food.
Maintenance
Maintenance of this type of tank is relatively straight-forward, and consists of three things other than feeding the fish. You have to:
1. Do a weekly water change of one bucket of water
Use your gravel siphon to remove one bucket of dirty water from the tank. Do this into your DIRTY bucket. For the fine art of how to use a gravel siphon click here (coming soon).
Then add the water from your CLEAN bucket to the tank.
Refill your CLEAN bucket in preparation for next week's water change.
2. Rinse the sponge filter
You can do this when you do your weekly water change. Take out the sponge filter and squish it in one hand under some warm water. The first squish you will see lots of dirt come out in the water. Repeat the squishing until you no longer see signs of dirt coming out. This is actually good wrist exercise. Five or ten squishes is usually enough. Reattach the sponge. That's it!
3. Clean the glass
You shouldn't need to do this more than say once a month. Use your white scrubee pad. Rinse it under warm water to clean it. Don't use any soap! By the way, you are only doing this for the sake of visibility -- the green algae doesn't hurt the fish at all, in fact, they eat it. For that reason, I usually let the algae grow everywhere but on the front glass.
Breeding
Nesting
Once your fish are happy they will start to think about nesting. With convicts this may take a month or two, or in some cases, as little as a day after they are in their new tank. I had one female who thought half-an-hour was more than long enough before she started nesting.
Watch the female in particular. She will start spending extra time around the pot. Things are imminent when you see one or both of them pecking at the inside surface of the pot -- they are cleaning it in preparation for laying eggs.
Egg laying
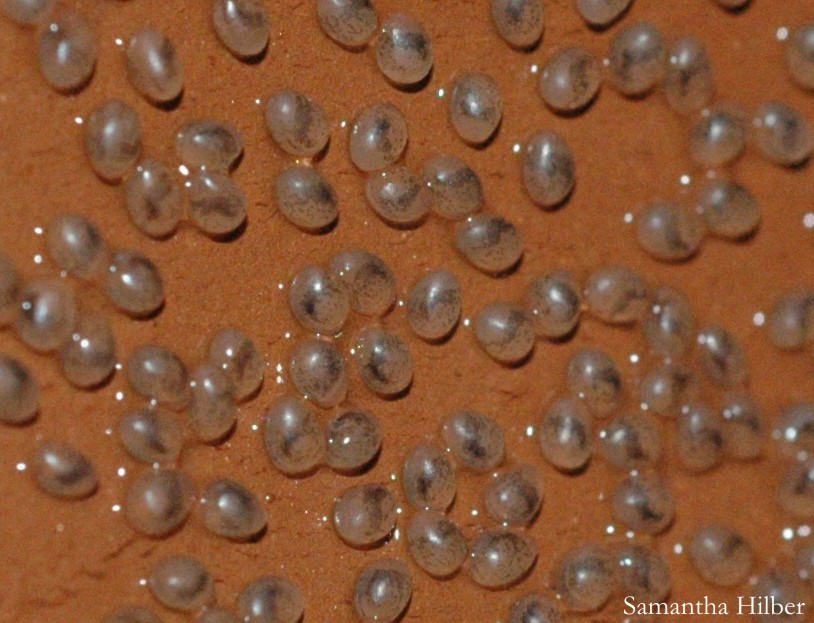
Almost invariably the female will lay her eggs on the upper inside surface of the flowerpot (the flowerpot closely resembles the kinds of sheltered cave-like areas these fish use in the wild). At first you may not see the eggs, but look closely and you will see a couple of hundred, almost transparent blobs about 1.5 mm in diameter.
Even if you don't see eggs, you can tell that she has if you see the following. First, the female's color becomes much more contrasty, i.e. the whites are whiter and the blacks are blacker. Second, she will spend a lot of time in one spot in the flowerpot, waving her pectoral fins (the ones on the side) back and forth. She is fanning the eggs.
As the eggs develop, they get darker. The "darkness" is actually the tiny body of the baby cichlid inside the egg. To some people, the eggs appear to shrink, but that is not the case. Earlier in development, you are looking at the whole egg. Just before hatching, most of the egg is transparent and you see mostly the tiny body inside.
Hatching
At 80oF, the eggs will hatch in about 3 days. They hatch into what we call "wrigglers". Wrigglers cannot swim; they can only wriggle -- they look a lot like tiny tadpoles. At first you might see the wrigglers in the bottom of the flowerpot, but very often the parents will move them to a pit they have dug somewhere else. Over the next few days they may move the wrigglers many times. The parents do this by carrying the wrigglers a few at a time in their mouths. Watching the parents move the wrigglers is really cool. They generally alternate so that somebody is always at each pit.
Free-swimming Fry
After about four more days, suddenly you will awake to find that the kids aren't wrigglers anymore, but rather are swimming about as a little school. Both parents take an active role in herding the fry around as the fry peck at tiny bits of food.
It is only at this point that you need to add some food for the kids. Up until now, the kids are feeding off their internal yolk sac. The point of free swimming is also the point at which they start eating exogenously, i..e taking particles into the mouth to feed.
Baby convicts aren't picky. The simplest food is crushed flake food. Don't add a ton -- look how small they are! It is better to add a little several times a day than a lot at once. If you really want the kids to do well, consider buying frozen brine shrimp, or even better, hatch out some brine shrimp yourself. Click here to find out how you do it.
Enjoy Watching the Parental Behavior
Now sit back and enjoy watching your fish. You will notice that the adults are tireless parents.
Here are some things to watch for.
Fry retrieval. If a fry strays too far from the group, a parent will go out, grab the fry in the parent's mouth, return to the school and spit out the fry. Parents also seem to clean fry every now and then. A parent will grab a fry, chew on it for a bit, then spit it out.
Fin-digging. A parent may attempt to stir up food for the kids by wriggling in the gravel. This isn't too common in tanks, but they do it in the wild quite a bit. In tanks, we shouldn't really have piles of rotting stuff lying around.
Leaf-turning. A parent will grab a leaf lying on the bottom and turn it over. This exposes food items that might be living on the underside. Again they do this more often in the wild, because there are usually leaves lying around and invertebrates grow on the undersides. In your tank, try putting in a small piece of flat plastic (say 1 inch wide by 2 inches long) that sinks. The parents may treat it as a leaf and try to turn it over.
Guarding. The main thing convicts do, and do very well, is guard the fry. Both parents guard the fry, though often the female stays closer to the school of fry and the male patrols the perimeter. If you are curious about this, you can play some games with them. Get a small hand-mirror and hold it up to the glass. Watch what happens! Or, if you really want to get into it, consider my model-predator technique. (coming soon).
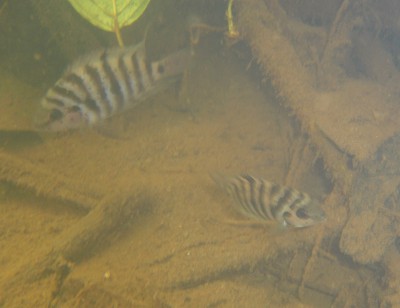
Convicts in the Wild
I have been fortunate to observe convicts breeding in two radically different locations in Central America. Convicts are found in the river where I do most of my field work, the Rio Puerto Viejo, Costa Rica and in the surrounding rivers. Convicts are actually quite rare there, but their close relative, Archocentrus septemfasciatus is quite common. There is no underwater vegetation in the Rio Puerto Viejo. The above photo was taken in the Rio Isla Grande, in northeastern Costa Rica.
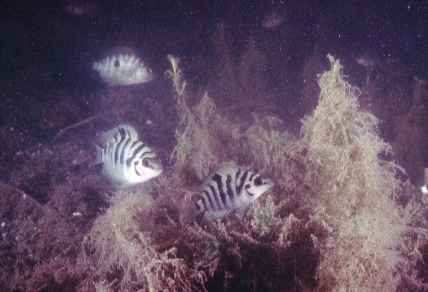
Convicts are much more common in Lake Xiloa, Nicaragua, where the above photo was taken. In Lake Xiloa, convicts breed in little caves in areas where there are lots of aquatic plants. The parents then lead the newly swimming fry in a tight school, staying quite close to the substrate, probably to avoid the numerous predators found in the lake. The chief predators are other cichlids, including other convicts, and a predatory goby-like fish, called a sleeper goby.
The Next Step
After you've tried the simple convict aquarium, the opportunities are endless. Consider trying the same thing but with a larger tank. In a larger tank, you will get to see even more of the behavior that convicts and other cichlids do in the wild. For example, if you place a large piece of wood going from the bottom front of the tank, up towards the back or side of the tank, say at about a 45o angle, you will get see how the kids swarm up and around objects to feed. The parents remain nearby to protect them. At first, the parents lead the kids, but as the kids grow larger, the kids move as a group and the parents basically follow and watch over them.
You might also try to put two sets of parents in a larger tank (at least a 40 gallon tank). Setup breeding pots at opposite ends of the tank. You can then see the interactions between the two groups of parents and kids. You may even see "brood adoption" where kids from one brood end up in the brood of the other set of parents. Exactly how and why this occurs in the wild is an important topic of current research.
You can also consider keeping any of the close relatives of the convict, all of which can be kept in the same way. These fish are not quite as common in the hobby as convicts and don't breed quite as readily, but are a great next step. These fishes include, Archocentrus sajica (from the west side of Costa Rica); Archocentrus spilurum (from Guatemala); Archocentrus septemfasciatus (from eastern Costa Rica), Archocentrus myrnae (from eastern Costa Rica) and Archocentrus nanoluteus (from Panama).
Postscript: What if Things Don't Go Right?
Even if you think that you have done everything right, it is possible that you may experience some deaths in a fish tank. Do not be discouraged, particularly if you are new to the hobby of keeping fish. Fish die and while that is unfortunate it is not 100% preventable. There is an art and a science to fish keeping and it is something that takes a bit of practice to become good at: Stick with it. EVERY fish keeper has problems now and then, and you must not let that stop you.
The biggest problems I see are either people not getting the equipment they need (yes, you really do need a heater, or rather, the fish really do), or the bane of almost every hobby, namely trying to do too much too quickly. Start slowly, learn as you go and enjoy the ride.
If you find this page useful, please let me know. If there are things that need clarification, I would like to hear about it. I am particularly interested to hear from schools that use this information to set up a classroom aquarium. My email is rcoleman@cichlidresearch.com
![[Go Back to Contents]](gifs/back.gif) |
![[Send email to Ron Coleman]](gifs/address.gif) |
|
![[Go to Contents of Cichlid Research Home Page]](gifs/cichres.gif)